

Hope you are enjoying the blog hop so far so here is what to do next. I loved Ann's box yesterday it was gorgeous. Just to let you know this is a long post but please bear with me there is a surprise at the end!
Simply follow my blog by joining Google friend connect,
which is in the sidebar.
which is in the sidebar.
Then leave a comment letting me know that you have joined as a follower.
Then you are in the draw to win todays prize from Scottie Crafts:

A cool mask and a distress ink from Tim Holtz and some reusable
doilies which are perfect for using as masks....
doilies which are perfect for using as masks....
You have until 11.59PM tonight to leave a comment and be in for today's draw!
Also if you pop over to Scottie Crafts for TODAY ONLY there is
25% off in stock Tim Holtz dies and Texture plates..Don't miss out !
Also if you pop over to Scottie Crafts for TODAY ONLY there is
25% off in stock Tim Holtz dies and Texture plates..Don't miss out !
Remember you don't need a Sissix Machine for these - the dies go through a cuttlebug with two B plates and the texture plates are the same as embossing folders.
and DON'T forget to go visit Michelle's blog tomorrow for some more inspiration and another daily prize.

I purchased a 12' by 12' canvas from an emporium shop for under $5. I also bought some 4 by 4 canvases for 85 cents each. For this project I used the back of the canvas.
The first step is to chose a 12 x 12 patterned paper you want to use as a background. On my project I have used a My Minds Eye Paper. Cut this paper done to 11 by 11 and put on your choice of adhesive.
Then push the paper into the back of the frame and adhere.
Adhere Tim Holtz Tissue Tape around the frame of the large canvas include the outer and inner edges. When that is done use Mod Podge or other sealant over the top. Add the tissue tape to the mini canvas sides as well. This does not even use the tissue tape up there is a lot on the roll! Once the mod podge is dry coat the tissue tape with a thin layer of Tim Holtz Picket fence Crackle paint. When this is dry do a rough coat of Tim Holtz Peeled Paint Crackle paint.
To complete the mini frames adhere your photos to the canvases and then paint a rough layer of peeled paint crackle paint over the edges of the photo and the canvases and place some bling on once the paint is dry. Adhere the mini canvases to the inside of the large canvas frame using a strong adhesive.
Something which is great is the fact the Tim Holtz dies can cut fabric really easily and I have created the flowers on the canvas with some scraps of fabric I had, the Tim Holtz Tattered Florals die and some brads.

The leaves were made using the Tim Holtz Tattered Leaves die and then coated with Tim Holtz peeled paint crackle paint and ink. The veins I drew on with a fine Sharpie pen.
Once you have created your flowers and leaves adhere them to your project. If you can't get hold of these dies an alternative is using some of Primas larger flowers and some Prima or diecut leaves.
This next step is to use a Cage and Bird die also by Tim Holtz. I have inked the bird with black stazon Ink and coated the cage with peeled paint crackle paint. I then adhered it to the canvas. an alternative for the cage is a Prima Bling bird.
The other die I have used is the Tim Holtz Tree Branch die. Instead of using it as a tree I have used it as branches. I inked them with Black Stazon then coated them with glossy accents and let them dry before adhering them to the layout.
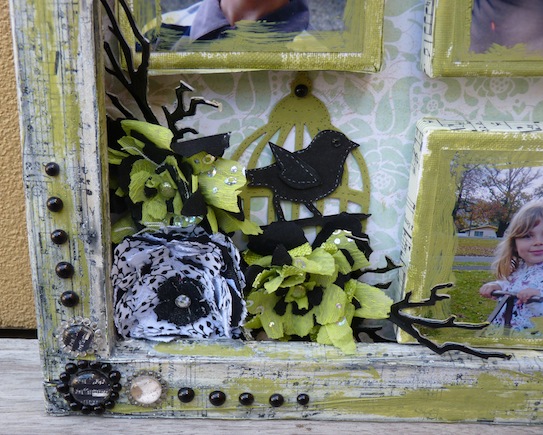
The final touch is some Prima pearls and pebbles and Voila one canvas done and dusted!
Are you still here? Sorry it is such a long post but here is my surprise. It is Thanksgiving soon in America and I thought I would add an incentive for everyone who follows my blog. I am so thankful for the scrapping community I have come to know over the last four and a half years. As some of you know I was very reserved and shy when I started scrapping and now after being in the scrapping community this has changed a lot. Who would have thought I would be teaching classes a year ago even! Thank you Adrienne at Scottie Crafts and Anne who first approached me for the opportunity. So as my thanks to awesome supportive scrapping community out there any New Zealand crafter who writes a comment and follows me is in the draw for this RAK. I will close this draw at midnight the 19th of November.

THANKS AGAIN!
Hi Bev, what a beautiful project I love the idea of using the large canvas around the other way!!!
ReplyDeleteFollowing you now and congrats on the teaching with Scottie Crafts
Nice canvas Bev. Love the colours
ReplyDeleteLove your canvas Beverley, gorgeous work.
ReplyDeleteWhat a gorgeous canvas, love the idea of using the reverse side as a frame... now following you, will have to make my way to Scottie Crafts one day soon
ReplyDelete=-)
Your canvas looks fabulous! I'm a follower of your blog!
ReplyDeleteLove the colors on your canvas popping oyut to buy one now!
ReplyDeletelove the colour choice I enjoy your blog its on my favourites list!.
ReplyDeletegreat project and lots of tim product!!
ReplyDeleteHI Bev. It's Pam not Pete.... I love your canvas. It's very pretty. I love that Shabby Chic look and Tim Holtz products are divine. What a fun thing to do. Have a great day
ReplyDeleteWhat a fantastic project. I'm a follower too! LOL
ReplyDeleteLovely frame, lots of gorgeous texture. Following now so I look forward to see what else you create for us/Scotties.
ReplyDeleteAll I can say is Yummo!!!! That canvas rocks Bev!
ReplyDeleteGreat canvas Bev!
ReplyDelete:-)
And teaching has really given you more confidence....Good for you!
Hi Bev..Well done kiddo. I love seeing the way you use product. Hope to see lots more of your very inspiring work.
ReplyDeleteVery cool Bev!! You just keep knocking them out of the park!!
ReplyDeleteHi Beverley I am thankful to for having someone as lovely and talented as you I can call my friend.Your canvas is stunning Bev love the flower and colours you have used another masterpiece... Ps I am already a follower..:)
ReplyDeleteAwesome! love this idea.Love blog hops. Have been here before and love your work.
ReplyDeleteThanks so much Bev, I love your beautiful work and classes. I am a follower and keep stopping by to see the stunning things you keep creating. Thank you so much.
ReplyDeleteJen
I'm a follower :) yay for the confidence boost from scrapping, I'm the same as you, who'd have thought huh? yay for Adrienne knowing a good thing when she sees it xx
ReplyDeleteI love this canvas!
ReplyDeleteFab work Bev - I can relate to the shy bit so way to go you for teaching classes - your canvas is gorgeous
ReplyDelete:) Vicki
I absolutely love what you have done with this canvas and the great use of the Tim Holtz dies. This is something I will definately have to give a go.
ReplyDeletewow your work is amazing! I am so pleased I can now follow you on line:)
ReplyDeleteI absolutely love what you have done with this canvas and the great use of the Tim Holtz dies.
ReplyDeleteLove this canvas - just gorgeous
ReplyDeleteAwesome canvas and doesn't look to difficult with your instructions........
ReplyDeleteawesome canvas it'll be great to follow your blog
ReplyDeleteGorgeous work as always Bev!! I too have met so many cool new people who are now my lovely friends (like yourself) through scrapbooking which is amazing!!
ReplyDeletegreat project Bev, stunning.....
ReplyDeleteOH! tissue tape?! That sounds cool, might have to get some of that ;-P
ReplyDeleteLoveing the leaves you did Bev,gorgeous work,im a follower :)
ReplyDeleteI is a following you lol Yay for remembering my google password. Loving that canvas - I really must try the back of a canvas
ReplyDeleteI just love your work Bev and the canvas looks great.
ReplyDeleteIm following you, I love canvas work, and this is stunning!
ReplyDeleteLove your style Bev and your classes, you have truely inspired this novice scrapper!
ReplyDeleteWhat a beautiful way to display much loved pictures! I love the colours and the embelishments.
ReplyDeleteGreat canvas. Beautiful colour scheme. Can't wait to see what's coming next...
ReplyDeleteHey Bev, fancy meeting you here! I think you're friends on a couple of my 'nings' too (webster's??) anyway, thanks so much for sharing the canvas tecnique I've bn looking into doin' something similar for a while and I LOVE yours so much. adorable pics and stunning pps & colours used. Tx again :) ps. does "ex pat Kiwi" livin in BrisVegas count? LOL
ReplyDeleteThis is a great idea - using the back of the canvases like that. So cool.
ReplyDeletePlaying catch up still! Love the canvas idea, must give it a try soon!
ReplyDeleteBev...That is just really wicked! I love your work and you are inspiring.
ReplyDeleteHave just joined and will get to know how to use all this blog thing lol love your work
ReplyDelete